Practice worksheet
Chinese Checkers Jump Rules: 10 Annotated Practice Positions
Check one adjacent bridge, an immediate empty landing and the same moving piece at every hop. Work through ten original local-board positions, then open their answers. Jumped pieces remain on the board, and optional successive hops are separate from the long-jump variant.
The ordinary jump rules used in all ten positions
In these positions, a jumping turn moves one red piece over one or more adjacent pieces. Every hop lands in an empty hole immediately beyond the piece being jumped, along the same board line. After a legal landing, you may change direction for another legal hop or finish the turn.
Masters Traditional Games describes an adjacent step or one or more hops by a single peg, with hops over any colour and no removal of pegs. [1] That is the ordinary movement rule used here. Do not mix an initial step with a later hop in the same turn, and do not switch to a second moving piece halfway through a chain.
The ten positions are original teaching examples, not recorded games. They use a local patch of the central board to isolate movement decisions. The full starting setup, reaching a destination triangle and endgame blocking are separate topics.
How to read the original local-board diagrams
Every displayed hole has a worksheet label such as D4 or F2. These are local labels printed on these diagrams, not a universal Chinese-checkers notation. Follow the drawn board lines: each hole has up to six neighbours in the triangular lattice. Letters and numbers alone are not a substitute for checking the line.
Red pieces are marked R1, R2; blue pieces B1, B2. R1 is usually the proposed moving piece. A white hole is empty unless it contains a labelled piece. Dashed numbered arrows show the proposed actions, including illegal proposals; an arrow is not approval of the move.
For each question, identify the starting piece, bridge and landing hole before opening the answer. For a chain, update the moving piece’s location after every hop and leave the bridges where they were. The first illegal action stops the proposed sequence from being a legal turn.
Three checks at every hop
- One adjacent bridge. From the current hole, is exactly the neighbouring hole on that line occupied?
- Immediate empty landing. Is the next hole beyond that bridge on the same line empty?
- Same moving piece. Is this still the piece that began the jumping turn, with no ordinary step added?
The bridge may be red or blue. Jumping over it does not remove it or give permission to land on another occupied hole. A legal chain can be short; being able to hop farther does not require you to do so.
Position 1: A bridge of your own colour
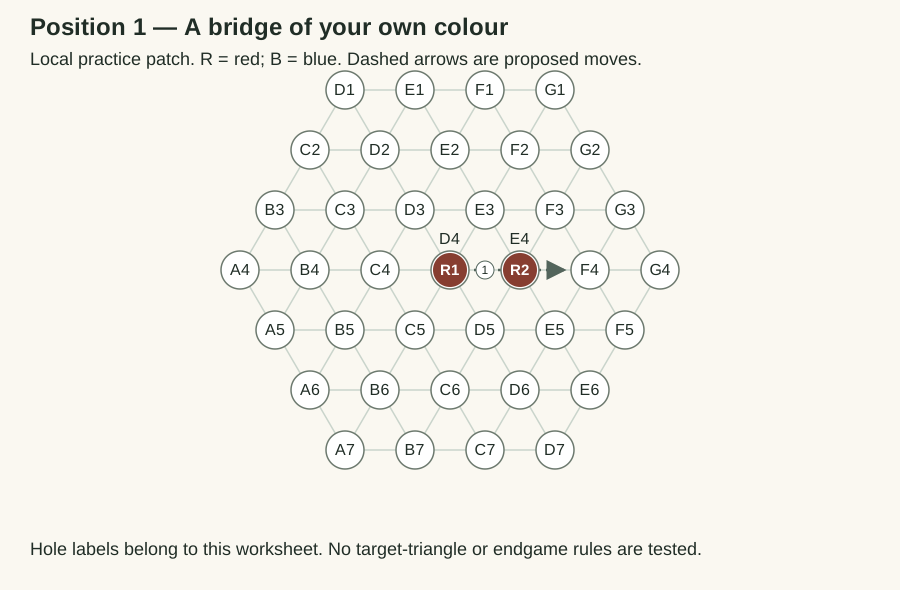
Case 1
Red R1 is at D4 and another red piece is at E4. Is D4 → F4 a legal ordinary jump?
Show answer and explanation for case 1
Yes. Jumping over your own piece is allowed.
E4 is directly adjacent to D4 on the same line as empty F4. R1 finishes at F4; the red piece at E4 stays in place.
Position 2: A bridge of the other colour
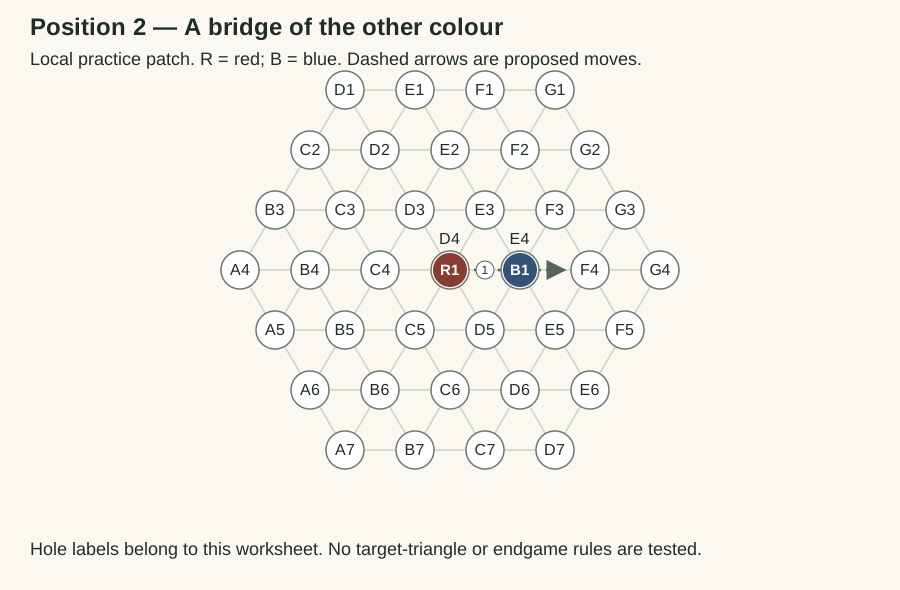
Case 2
The bridge at E4 is blue. Is D4 → F4 legal, and is the blue piece removed?
Show answer and explanation for case 2
The jump is legal; the blue piece remains at E4.
The jumped piece may be any colour. This is not a capture: the board still contains both pieces after R1 reaches F4.
Position 3: An occupied landing
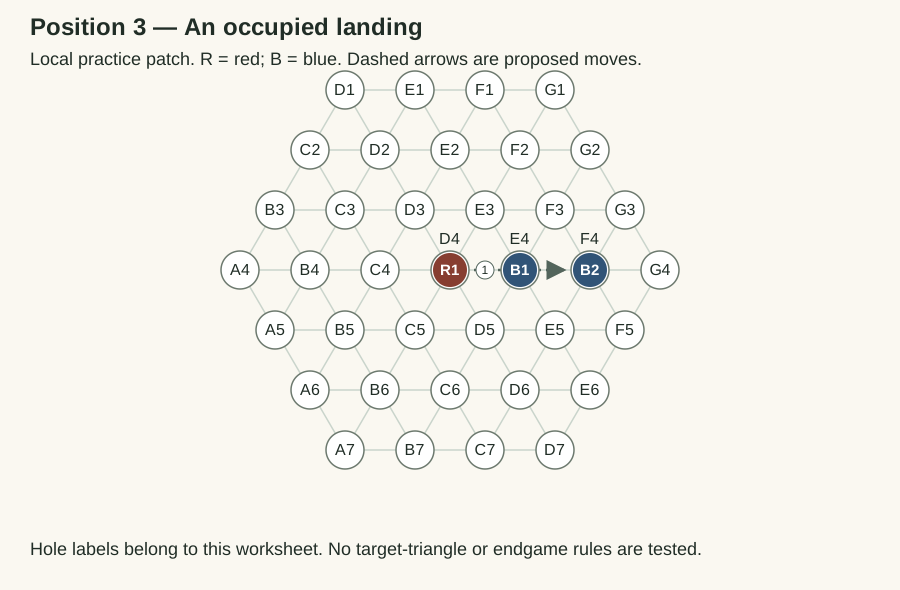
Case 3
E4 contains a bridge, but F4 also contains a piece. May R1 jump from D4 to F4?
Show answer and explanation for case 3
No. The landing hole is occupied.
A bridge does not make an occupied destination available. You cannot capture or displace the piece at F4 under the ordinary jumping rule.
Position 4: A distant bridge
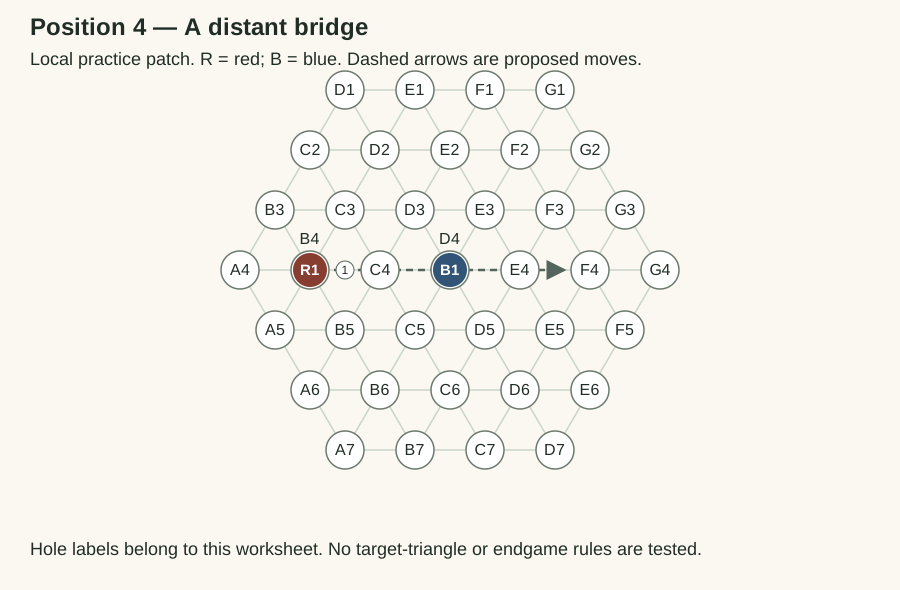
Case 4
C4 and E4 are empty; D4 contains a blue piece. Is B4 → F4 an ordinary adjacent-piece jump?
Show answer and explanation for case 4
No in the ordinary rules used here.
D4 is not adjacent to B4; C4 is the empty neighbouring hole. The balanced longer leap fits the separate Super Chinese Checkers idea described by the source, but that variant must be agreed beforehand. It is not an ordinary jump in this worksheet.
Position 5: Two adjacent pieces in the way
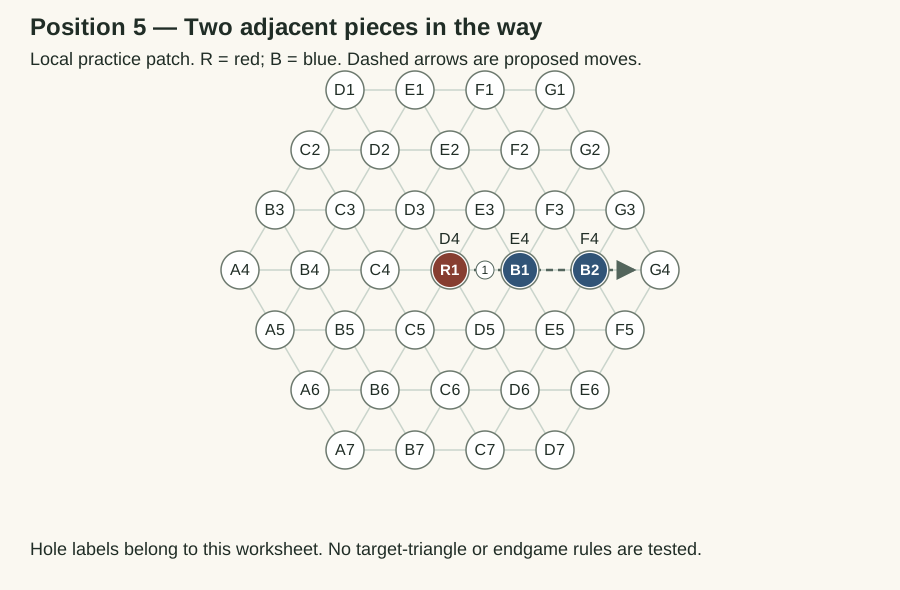
Case 5
Can R1 leap across both E4 and F4 in one jump and land at empty G4?
Show answer and explanation for case 5
No. An ordinary hop crosses one adjacent piece.
D4 → G4 spans three intervals rather than two and crosses two pieces. D4 → F4 would also fail here because F4 is occupied. This is not a valid shortcut through the blockage.
Position 6: Change direction after landing
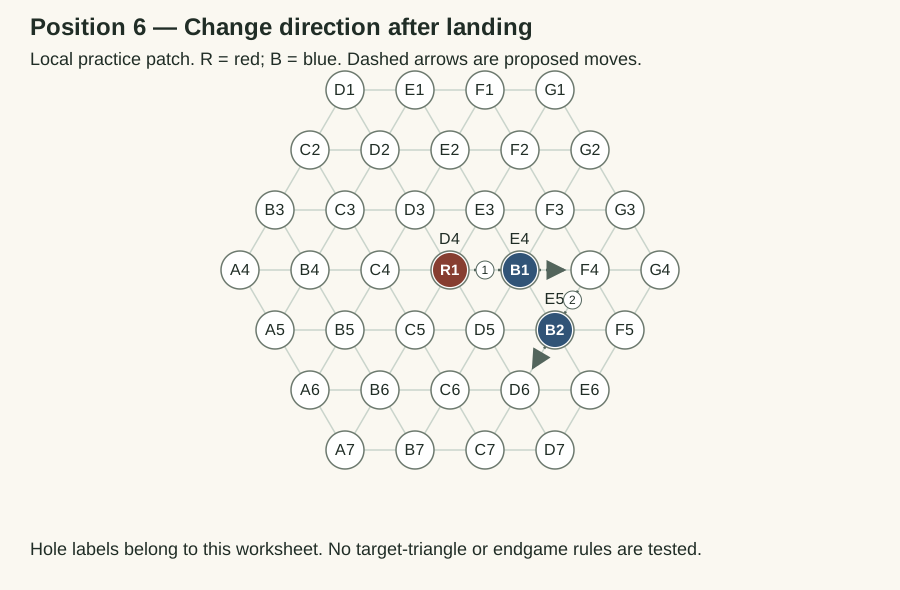
Case 6
Is D4 → F4 → D6 a legal two-jump turn, even though the second hop turns diagonally?
Show answer and explanation for case 6
Yes. Check each hop from its new starting hole.
The first hop crosses E4 into empty F4. From F4, E5 is adjacent and D6 is the empty hole directly beyond it. Both bridge pieces remain on the board.
Position 7: Stop before an available extra hop
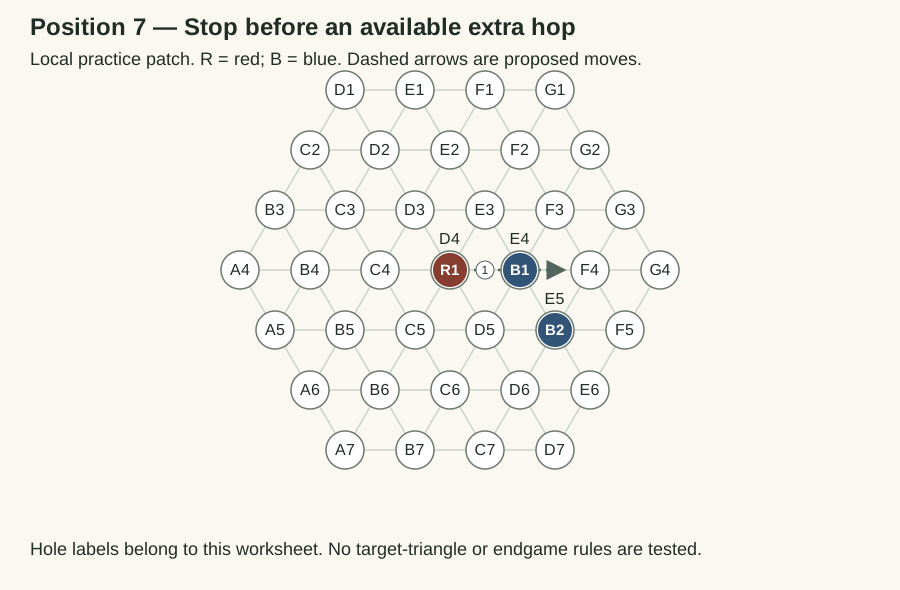
Case 7
A further F4 → D6 jump is available. Must R1 continue after reaching F4?
Show answer and explanation for case 7
No. You may finish the turn after the first legal hop.
Successive hops are optional under the ordinary rule described by the source. D4 → F4 is a complete legal turn; having another route available does not make continuation compulsory.
Position 8: A step followed by a hop
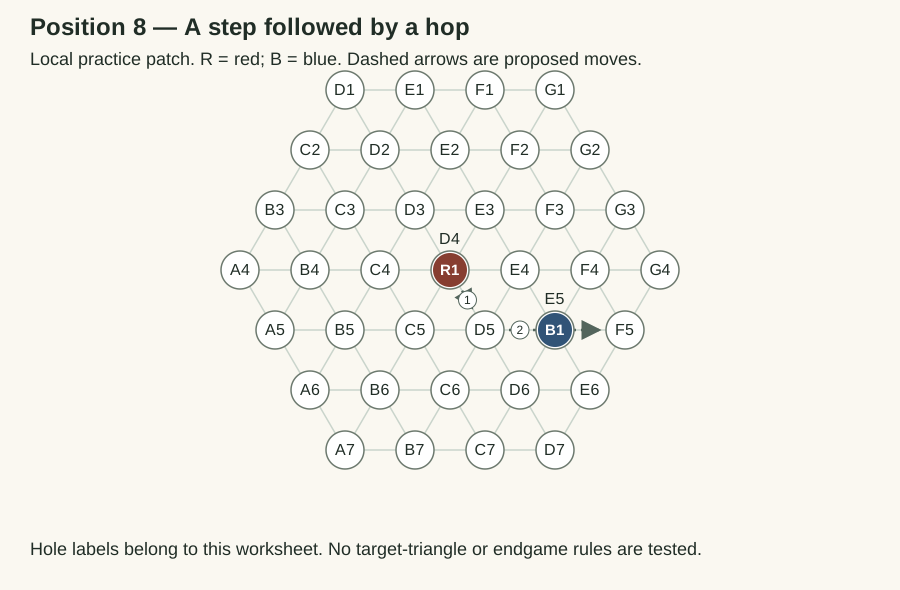
Case 8
May R1 step from D4 to empty D5, then hop over E5 to F5 in the same turn?
Show answer and explanation for case 8
No. Choose an adjacent step or a jumping turn.
D4 → D5 is a legal adjacent step by itself and ends the turn. D5 → F5 has a valid bridge pattern, but you cannot attach it to that step in the same turn.
Position 9: Changing the moving piece
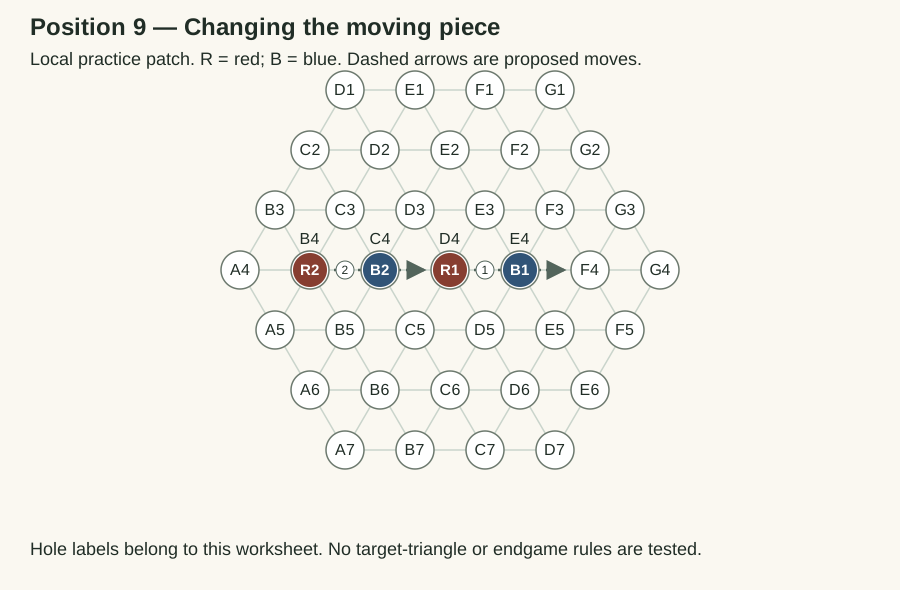
Case 9
After R1 jumps D4 → F4, may red R2 jump B4 → D4 as the second action of the same turn?
Show answer and explanation for case 9
No. A jumping turn keeps the same moving piece.
D4 is now empty, so the second jump has a usable bridge at C4. It still moves R2 rather than R1. A player cannot use one turn to move two pieces.
Position 10: A complete chain without captures
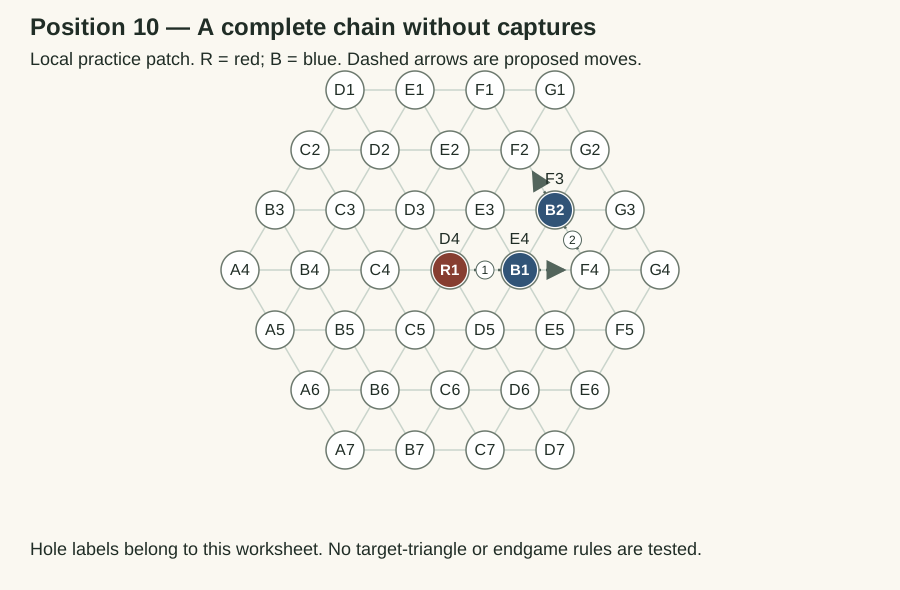
Case 10
Is D4 → F4 → F2 legal, and how many pieces remain after the turn?
Show answer and explanation for case 10
Yes. All three pieces remain.
R1 crosses E4 to F4, then F3 to F2. The final occupied holes are F2, E4 and F3. Neither blue bridge is captured or moved; only R1 changes position.
Keep long jumps and triangle rules separate; save the practice sheet
The source also describes Super Chinese Checkers: a single bridge can be farther away when it is at the exact midpoint of a straight jump, with equally spaced empty holes on either side. [1] Position 4 illustrates why such a leap must not be silently treated as an ordinary adjacent-piece hop. Agree on the version before applying it.
The same source gives particular destination-triangle and other-triangle conventions and proposes an anti-spoiling rule. Those are not universal tournament rules, and these central-patch exercises do not test them. Use your set’s printed instructions and your group’s agreed rules for a whole game.
Download all ten positions, proposals and answers as a text practice record (TXT). You can also print the page with questions only or with answers. Keep the labelled diagrams alongside the text when explaining a move.
After an incorrect answer, identify the exact failed check: missing adjacent bridge, occupied landing, excessive leap, mixed step-and-hop turn, or a change of moving piece. That gives you a specific rule to practise rather than a vague instruction to “look harder.”
Sources and further reading
- Masters Traditional Games: The Rules of Chinese CheckersFriendly-play rules describe single-piece turns, adjacent steps or successive adjacent-piece hops, any-colour bridges and no removal; separate Super Chinese Checkers long-jump and suggested triangle/anti-spoiling conventions. Original diagrams and questions here are independently created.