Practical guide
How Go Handicap Stones Change the Start: Setup and First Turn
A handicap changes the starting position and may change who places the first ordinary move. In the British Go Association’s described multi-stone setup, Black’s handicap stones are placed first and White then plays. Do not give Black an additional starting move. Record the board, exact stones, next player, komi and rules before beginning.
Separate setup stones from the next move
In an ordinary empty-board game, Black plays first and the players alternate. The BGA introduction describes handicap stones as being placed in lieu of Black’s first turn. Once all those stones are in position, White takes the next turn.
The setup stones are a starting advantage for Black, usually the weaker player. They are not a sequence in which White owes a reply after each stone, and they do not grant Black another turn after setup. An agreed handicap helps players of different strength arrange a game; it does not guarantee an exactly balanced result.
This guide uses one visually checked two-stone arrangement from BGA Diagram 15. It is not a placement table for every handicap, board size or server. The ordinary 9×9 starting card covers the separate empty-start task.
Agree on five things before putting down the stones
| Entry | What to record | Why it matters |
|---|---|---|
| 1. Board and coordinates | Size, orientation, letter key and rank origin. | A point such as D4 must identify the same intersection for both players. |
| 2. Handicap setup | Number, fixed or permitted free placement, exact Black points and any White starting stones. | A count alone cannot reconstruct a complete position. Use the rulebook or server’s actual arrangement. |
| 3. Next player | Who makes the first ordinary placement after setup. | For the two-stone BGA arrangement below, that player is White. |
| 4. Komi | Recipient, exact value and any tie procedure. | You cannot infer the agreed score adjustment from the stones. |
| 5. Playing and ending rules | Ruleset or learning convention, self-capture, repetition, scoring and dispute procedure. | A correct initial board does not settle later legality or scoring disagreements. |
If your game allows free placement, use its published procedure rather than silently treating our two fixed points as mandatory. A named event or platform may specify its own size, settings and handicap arrangement. Keep that source with the agreement.
A complete fixed two-stone example on 19×19
Here the board has 19 files: A–H, then J–T. I is omitted. Ranks 1–19 increase from the bottom, and Black faces the board from that bottom side. These coordinates match the arrangement visually read in the BGA two-stone diagram: Black occupies D4 and Q16.
There are no White stones. All other 359 intersections are empty. White is next. This is a complete occupancy-and-turn example; it deliberately does not assign komi or claim a finished game result.
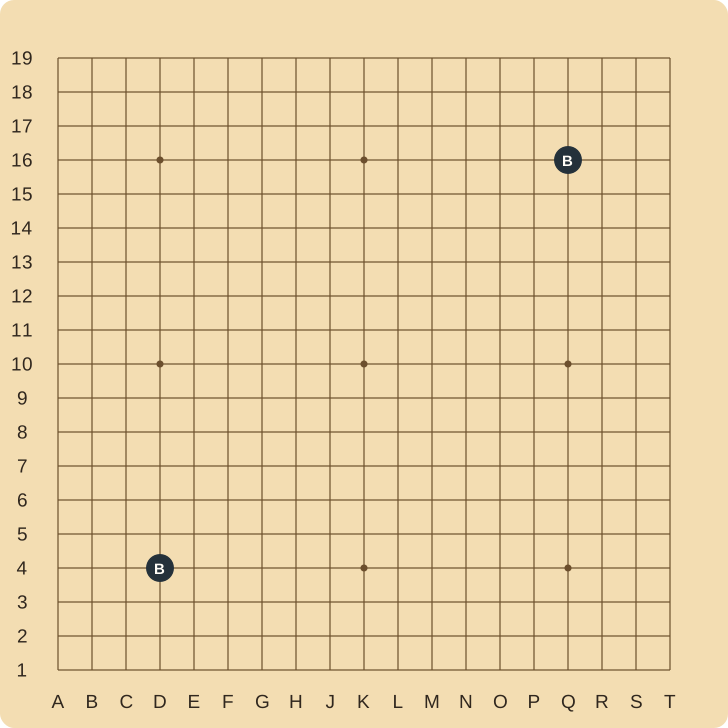
| Field | Value in this example |
|---|---|
| Board | 19×19; 361 intersections. Files A–H, J–T; bottom rank 1. |
| Black setup | D4, Q16: exactly two Black stones. |
| White setup | None. |
| Empty | Every point except D4 and Q16: 359 points. |
| Next ordinary move | White. |
| Komi and complete rules | Still to be filled from the players’ adopted agreement before a game begins. |
Use the full-size SVG if the 19-line labels are small on your phone. The exact two-point list above is the text equivalent; you need not estimate stone locations from the picture. Do not transfer this 19×19 coordinate key to the site’s 9×9 exercises, which explicitly include I.
Test the first two ordinary placements
To check turn order, try this original legal sequence from the two-stone setup: White D16, then Black Q4. These placements demonstrate turns and unchanged setup stones. They are not recommendations for best play, a joseki or a claim that the game is balanced.
- Start with Black D4 and Q16 only. White is next.
- White adds D16, an empty intersection. No capture occurs. Black D4 and Q16 stay in place; Black is next.
- Black adds Q4, also empty. No capture occurs. The complete position is now Black D4, Q16 and Q4; White D16; White is next.
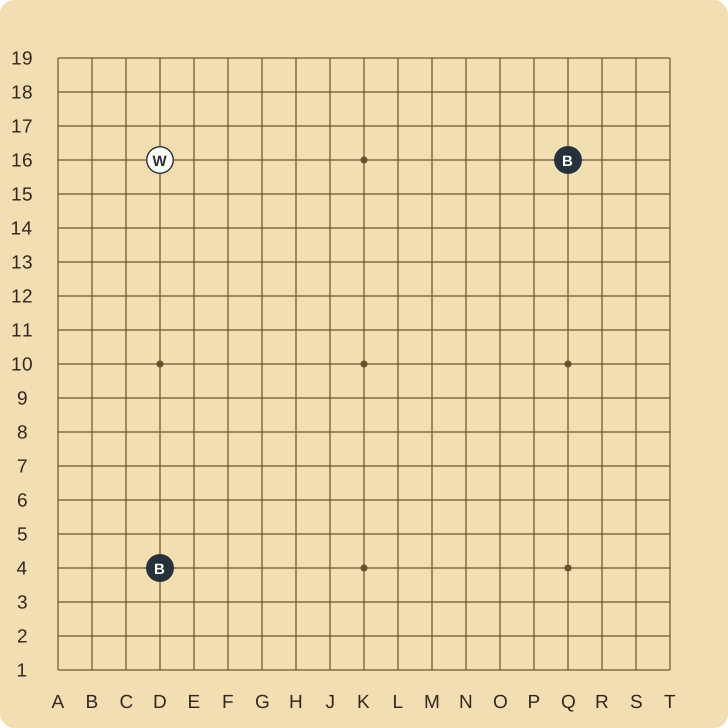
Each example placement is an isolated corner-region stone with four liberties immediately after it is placed. No stone moves to a new point or replaces a setup stone. If the two players’ positions differ, stop and return to the last agreed state before continuing.
| State | Assessment | Fix |
|---|---|---|
| Black D4 and Q16; White next | Correct start for this declared two-stone example. | Begin the ordinary alternating sequence with White. |
| Black D4 and Q16; Black next | The occupancy is right, but the turn is wrong. | Correct the next-player field before adding an ordinary move. |
| Black D4, Q16 and an extra point before White has played | An additional Black placement has been added. | Reconstruct the agreed setup and turn; do not assume three stones were intended. |
One-stone handicap is not “place one fixed stone, then White”
The BGA introduction treats the one-stone handicap separately: the weaker player takes Black and White receives no komi. Its Diagram 15 one-stone panel is an empty board. Black then makes the first ordinary placement, as in an empty-start game.
That is why the multi-stone instruction must not be applied mechanically to the label “one stone.” Do not place a fixed Black stone and automatically give White the next move merely because you have selected a one-stone handicap in conversation. Check the convention the players or software actually use.
Our full-board example is specifically the BGA two-stone arrangement. We have not published an unchecked list for three through nine stones. Use the actual placement source when selecting another count, especially if the board is smaller or the platform supports a different method.
Keep komi out of guesses made from the diagram
Komi is a score adjustment associated with the first-move advantage. The BGA introduction describes points being added to White’s score in games between players of the same strength, and no White komi in its one-stone handicap convention. That does not supply a universal numeric setting for every handicap game.
Write the actual value and recipient in your agreement. If the value is unknown, finish that agreement before starting a scored game. Do not copy an even-game value from a tutorial or calculate komi by multiplying the number of setup stones. Neither operation follows from the pictured position.
The source page displays a 2017 update date. For a current event or online game, check the organizer’s or server’s published rule settings. This article explains the setup mechanism; it does not certify a platform’s current default.
Check a digital board without guessing its button names
Different apps label their controls differently. Before confirming a game, inspect the information that actually appears: board size, handicap count and method, Black’s starting points, next player, komi and ruleset. If a preview is provided, compare it with the complete agreed occupancy.
Distinguish setup stones from ordinary recorded moves. A viewer may show two Black stones at the root position without a White reply between them. That can be correct for handicap setup. Conversely, a replay with two unexplained Black ordinary turns is not proved correct by the handicap label alone.
If the app offers no clear setup preview or rule explanation, retain a screenshot or complete point list and consult its documentation before using the result as a rules lesson. No particular interface or automatic handicap calculation has been tested or asserted here.
Print a before-play setup card
| Field | Fill before beginning |
|---|---|
| Board / coordinate key | Size: ______ Files: ______ Bottom or top rank origin: ______ |
| Placement source / method | Rules or instructions: ______ Fixed / permitted free placement: ______ |
| Black setup | Count: ______ Exact points: ____________________ |
| White setup | Exact points, or explicitly none: ____________________ |
| Next ordinary player | Black / White: ______ |
| Komi | Recipient: ______ Value: ______ Tie procedure: ______ |
| Other playing rules | Self-capture / repetition / scoring / ending and disputes: ____________________ |
For the two-stone example, fill the board as 19×19, omit I, list Black D4 and Q16, list no White stones and mark White next. Complete the remaining komi and playing-rule fields from your actual agreement. Do not treat the remaining blanks as zero or as a universal default.
Case 1
The agreed two-stone BGA setup already has Black D4 and Q16. May Black now add an ordinary first move before White?
Show answer and explanation for case 1
No. White has the next ordinary turn in this declared setup.
The two handicap stones stand in lieu of Black’s first turn. An additional Black placement would change the agreed beginning.
Case 2
Does the two-stone picture tell you the komi, scoring system or winner?
Show answer and explanation for case 2
No. It establishes the complete starting occupancy and next player only.
Komi and rules need a separate agreement. No moves, prisoners or completed scoring result can be inferred from this initial diagram.
Use the right next lesson for the remaining question
Use the ordinary empty 9×9 start if you are arranging a no-handicap learning game. Use the coordinate and missing-position note if two records disagree about a point.
Once setup and the first turn are settled, practise liberties and captures on complete positions. Return to the Go lesson directory for a distinct opening or record-reading task rather than using setup stones as evidence of the strongest continuation.
Sources and further reading
- British Go Association: How to Play — handicap and komiFull introduction read 5 November 2026; its update date is 26 October 2017. Multi-stone setup and White’s turn are stated in the handicap section. Diagram 15 one- and two-stone panels were visually checked: the former is empty, the latter uses two opposite 19×19 corner star points. The one-stone convention is described in the komi section. Our labelled SVG and turn examples are original.
When a file has a handicap count but no stones
Use the HA/AB SGF diagnostic to reconstruct explicit setup points and distinguish a count from a placement instruction.