Practice worksheet
Go Liberties and Captures: A Small-Board Practice Worksheet
Use complete five-by-five positions, coordinate lists and explained answers to check liberties and accepted board states.
What a liberty is, and what the diagrams cover
A liberty is an empty intersection directly above, below, left or right of a stone or its connected string. Diagonals do not count. A string is captured when its last liberty is occupied by the opponent. Count distinct empty coordinates, remove an entire captured string, then inspect the position that remains.
This worksheet provides twelve original complete five-by-five positions. It starts with centre, edge and corner counts, then shared liberties, captures, prohibited placements and one immediate ko recapture. Every stone is listed as text as well as drawn. These teaching positions were constructed for this page and checked against the stated coordinate sets; they are not named-player games, historical records or professionally reviewed problems.
The British Go Association’s How to Play explains orthogonal connections, liberties, capture, no self-capture except when opposing capture supplies liberties, and the immediate ko prohibition.[1] Those are the conventions used here. Its complete introduction covers more than this exercise; scoring, komi, end-of-game agreements, seki and longer repetition disputes require their own study.
For game-family navigation, return to the Go / Weiqi hub. These complete local exercises serve a different task from decoding a short coordinate record: they make the count and resulting board independently inspectable.
Read the whole board and name the convention
Files A–E run left to right; ranks 1–5 run bottom to top. A1 is the lower-left corner and E5 the upper-right. Letters and numbers are this worksheet’s fixed coordinates, not SGF encoding. The outer grid lines are the real edges of each complete exercise board. All unlisted intersections are empty.
B means Black and W means White. The letters printed inside stones make their identity visible without depending on colour alone. A proposed placement is given in the question; a new stone is not present in the starting diagram. Each count or move exercise restarts from its own position. Do not carry stones, captures or turns from one exercise into another.
| Convention | Used here | Keep separate |
|---|---|---|
| Board | Complete 5 × 5 teaching boards | Not a crop of an unknown larger position |
| Placement | A stone goes on an empty intersection | No moving an existing stone or replacing an opponent |
| Connection | Same-colour stones touching along lines | Diagonal contact does not make one string |
| Self-capture | Prohibited after opposing captures are removed | Do not assume every ruleset has the same convention |
| Repetition | Exercise 12 supplies the immediate previous board | No ruling on longer superko history |
| Outcome | Count, captured set and accepted resulting board | No territory score or best-move verdict |
Use a printed board or reproduce the listed coordinates on paper. If your board has a different orientation, translate every coordinate consistently. A count without a stable coordinate convention is difficult for another reader to check.
Count strings and distinct empty points: exercises 1–6
Start from the named black stone. Follow every same-colour stone touching it along a line. Write the empty neighbours of that complete string, remove repeated coordinates, and count the remaining set. Stop tracing when the next point is empty, the opponent’s colour or outside the board.
The first six exercises isolate one source of counting error at a time. Open an answer after writing your own coordinate list. Compare missing or extra points rather than simply marking the number wrong.
Exercise 1: A centre stone
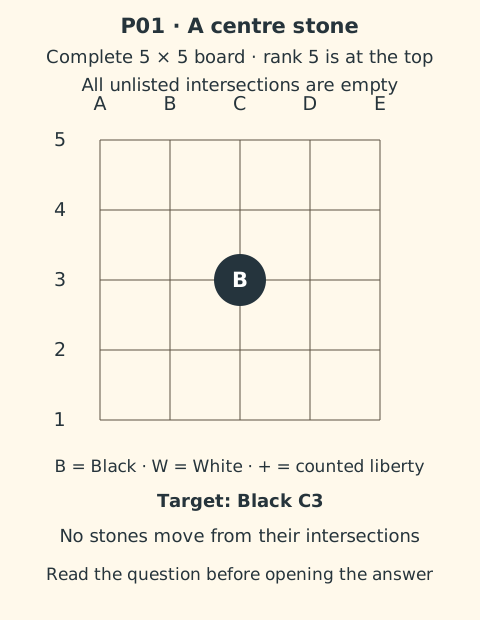
Count the liberties of Black C3. Write the coordinates before writing a number. Does an empty diagonal point add another liberty?
Black: C3. White: none.
Show answer and explanation for Go exercise 1
Black C3 has four liberties: B3, C2, C4 and D3. Each is empty and touches C3 along a line. B2, B4, D2 and D4 are diagonal and do not count. All other intersections are empty, but a distant empty point is not a liberty of this stone. This is a local count, not a claim about territory or the final score. Start every exercise by naming the target stone or string; otherwise a correct-looking total can refer to the wrong object.
Exercise 2: A side stone
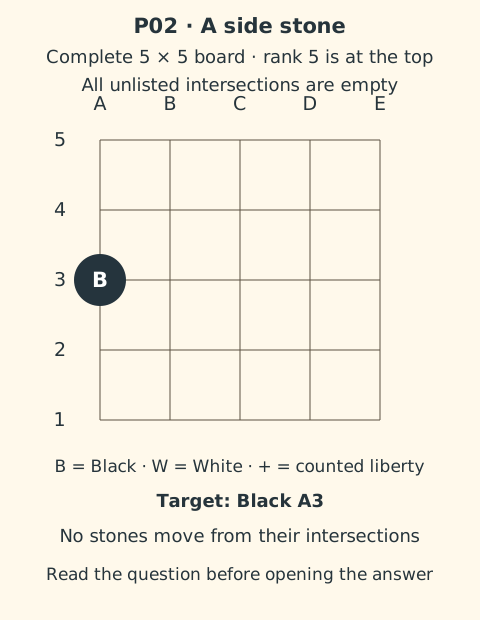
Count Black A3 on the left side. Is there a fourth liberty outside the printed board?
Black: A3. White: none.
Show answer and explanation for Go exercise 2
The three liberties are A2, A4 and B3. The board ends at file A, so there is no intersection to the left of A3. Do not imagine a stone or an empty point beyond the edge. The same side rule applies on the top, bottom and right edge. If another stone later occupies one of these three points, recount the position actually shown. Fewer empty neighbours at the edge does not by itself decide whether a move is strategically good.
Exercise 3: A corner stone
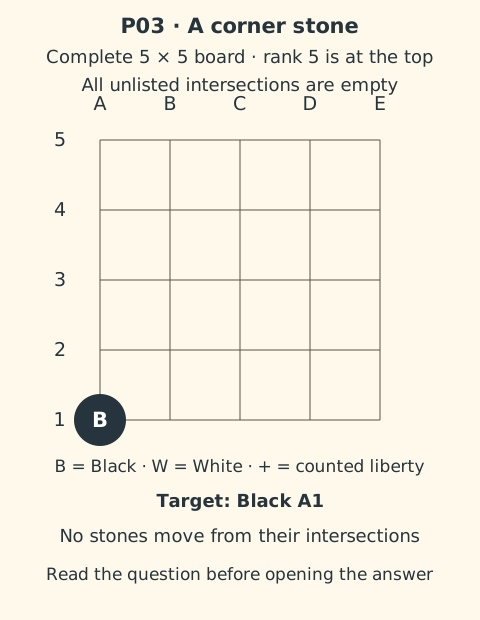
Count Black A1 in the lower-left corner. Which two directions end at the board edge?
Black: A1. White: none.
Show answer and explanation for Go exercise 3
Black A1 has two liberties, A2 and B1. Below rank 1 and to the left of file A there are no board points. B2 is diagonal, so it does not supply a third liberty. This corner is part of the complete five-by-five exercise board, not a cropped view of a larger board. That distinction matters: a crop would need additional edge information before its count could be trusted. Here all four edges are real and every occupied intersection is listed.
Exercise 4: Diagonal contact is separate
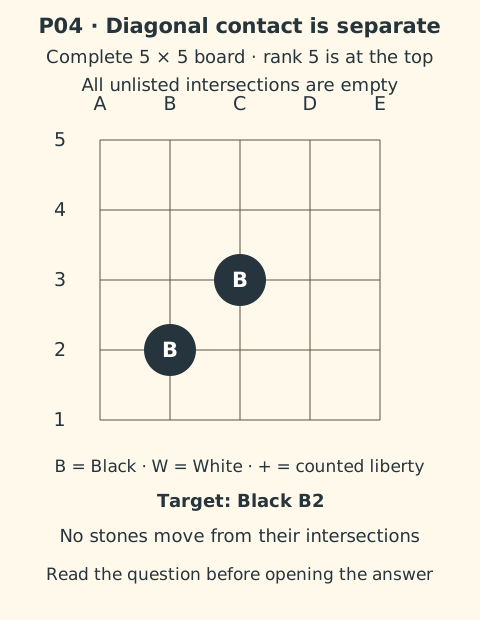
Black B2 and C3 touch diagonally. Are they one string? Count B2, then count C3 separately.
Black: B2, C3. White: none.
Show answer and explanation for Go exercise 4
They are two separate strings. B2 has A2, B1, B3 and C2; C3 has B3, C2, C4 and D3. Each therefore has four liberties. B3 and C2 occur in both lists because an empty point can be adjacent to separate strings. That overlap does not connect the stones and does not let one stone borrow all the other string’s liberties. Keep the target lists separate. If a later legal move connects them, start a new count on the resulting connected string.
Exercise 5: A connected pair
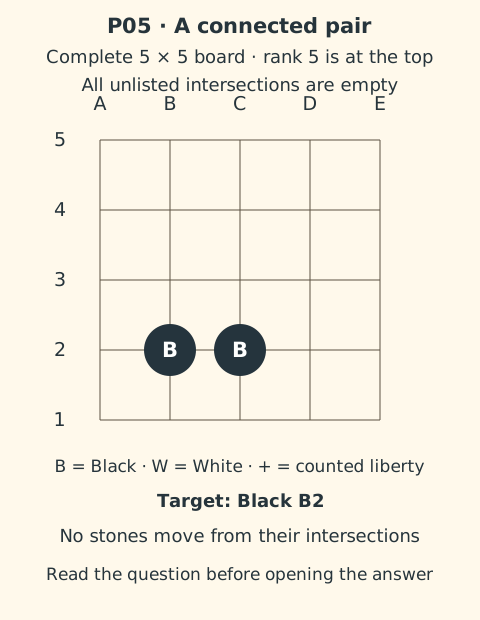
B2 and C2 touch along a line. Count the liberties of the entire black string. Why is adding four plus four wrong?
Black: B2, C2. White: none.
Show answer and explanation for Go exercise 5
The connected pair has six liberties: A2, B1, B3, C1, C3 and D2. B2 and C2 are occupied, so their shared boundary does not contain an empty liberty. Follow the whole string and collect its adjacent empty coordinates. The two stones are captured together only if that combined liberty set becomes empty. A string is not counted by adding the empty-board neighbour total of each member; doing that ignores occupied points and, in other shapes, can count the same empty intersection twice.
Exercise 6: Count a shared liberty once
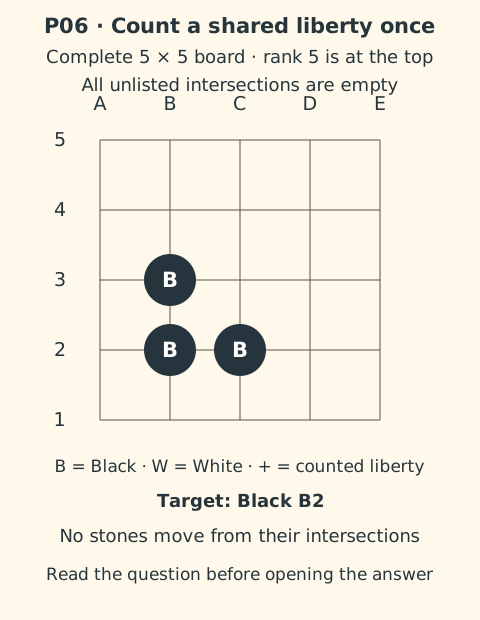
Count the L-shaped black string. C3 touches both C2 and B3: does that make it two liberties?
Black: B2, B3, C2. White: none.
Show answer and explanation for Go exercise 6
There are seven distinct liberties: A2, A3, B1, B4, C1, C3 and D2. C3 appears once, even though it touches two stones in the same string. The target is the complete connected set B2, B3 and C2. A useful hand method is to write each empty neighbour and cross out repeated coordinates before counting. The answer is a set of board points, not a count of stone-to-point contacts. This is why a longer string cannot be judged reliably from stone count alone.
Resolve captures before accepting a placement: exercises 7–11
For a proposed placement, first check that its intersection is empty. Put a trial stone there. Inspect adjacent opposing strings and remove any that now have zero liberties. Then find the complete string containing your new stone and count its liberties. A zero-liberty own string is prohibited under the convention used here. A repetition check is still a separate requirement.
| Step | Inspect | Record |
|---|---|---|
| 1 | Destination empty? | Reject an occupied destination without changing the board |
| 2 | Adjacent opposing strings after trial placement | List every zero-liberty string |
| 3 | Captured opposing stones | Remove the entire listed strings |
| 4 | Your resulting connected string | List its distinct empty neighbours |
| 5 | The stated repetition convention and history | Do not infer legality from a liberty count alone |
The following cases show why that order matters. In particular, a trial stone with no empty neighbour can become legal by capturing its surrounding opponents. Conversely, an attractive-looking empty point is not legal if it leaves your string with no liberties and takes nothing.
Exercise 7: Take the last liberty
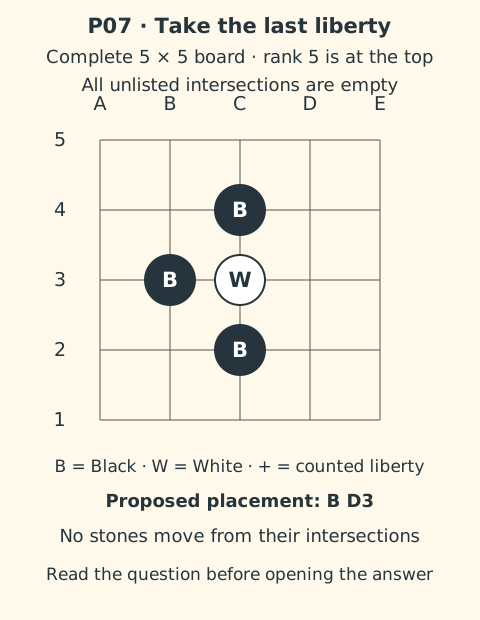
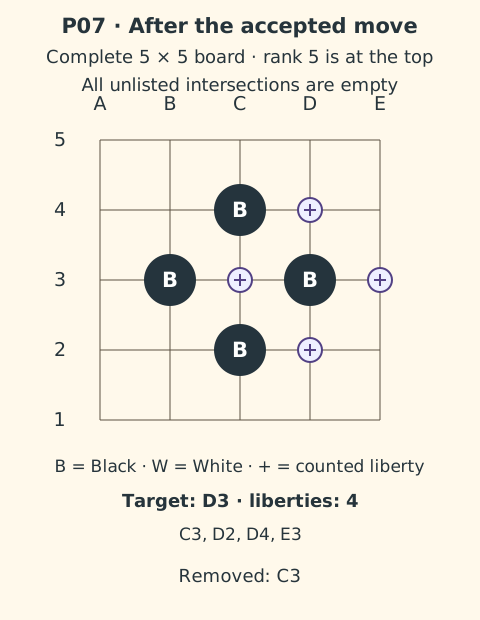
White C3 has one liberty. Black proposes D3. Which stone is removed, and how many liberties does the newly placed black stone have afterwards?
Black: B3, C2, C4. White: C3.
Show answer and explanation for Go exercise 7
Before the move, White C3 has only D3; B3, C2 and C4 are black. Black D3 fills that last liberty, so White C3 is removed. Recount after removal: Black D3 has C3, D2, D4 and E3, four liberties. C3 is now empty and can be counted. Black does not move onto C3 to perform the capture; the new stone stays at D3. The three other black stones are not orthogonally connected to D3 in this particular position. A one-stone capture does not establish the result of a whole game.
Exercise 8: Remove the whole string
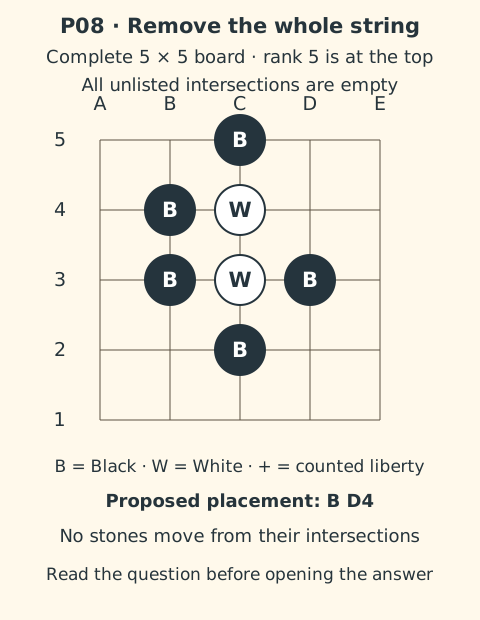
White C3–C4 is connected. Black proposes D4. List every removed stone and recount the black D3–D4 string.
Black: B3, B4, C2, C5, D3. White: C3, C4.
Show answer and explanation for Go exercise 8
D4 is the white string’s only liberty. C3 and C4 belong to one string, so both are removed when Black fills D4. The resulting black D3–D4 string has six liberties: C3, C4, D2, D5, E3 and E4. Two newly emptied points appear in that list. Remove the whole captured string before counting Black’s liberties; leaving one white member on the board would create a different, incorrect position. The other black stones remain where they were. This exercise checks capture mechanics rather than a preferred attacking plan.
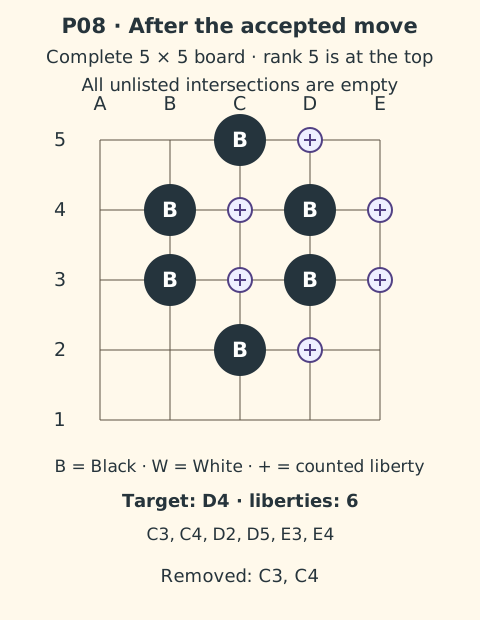
Exercise 9: Capture before checking your own liberties
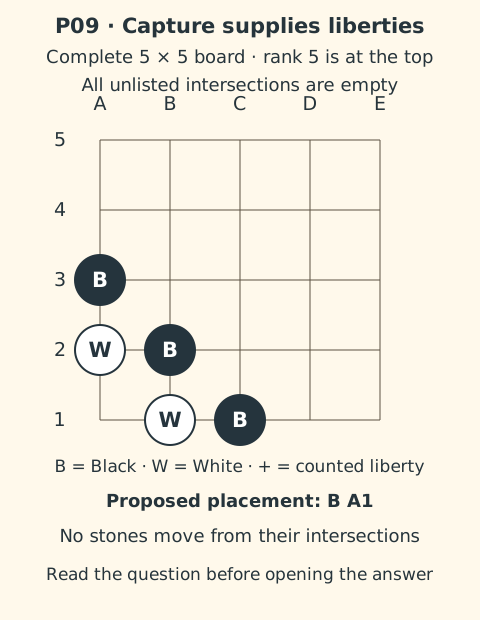
A1 initially touches White A2 and B1 with no empty neighbour. Is Black A1 self-capture, or does capture make it legal?
Black: A3, B2, C1. White: A2, B1.
Show answer and explanation for Go exercise 9
Black A1 is legal in the stated no-self-capture convention because it first captures White A2 and B1. Each white stone is a separate string whose only liberty is A1. Remove both after the placement. Black A1 then has the two empty liberties A2 and B1. Checking the newly placed stone before resolving opposing captures would reject this move incorrectly. The two captured stones need not be connected to each other. This is a complete corner position; the black stones A3, B2 and C1 supply the surrounding occupation shown.
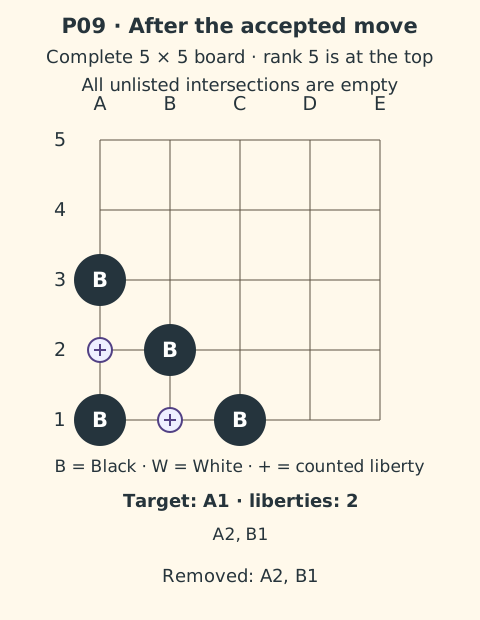
Exercise 10: A prohibited self-capture
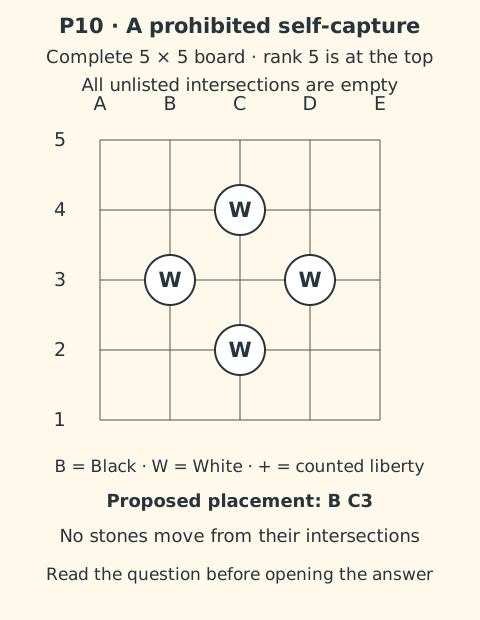
Black proposes C3 between four white stones. Does the placement capture any white string, and may it remain on the board?
Black: none. White: B3, C2, C4, D3.
Show answer and explanation for Go exercise 10
It captures no white string: each neighbouring white stone has other empty liberties. Black C3 would then have no liberty and is not connected to another black stone with liberties. Under this worksheet’s no-self-capture convention the move is prohibited. The final accepted board remains the starting board, with C3 empty. Do not keep the trial stone or remove a white stone merely to make the move work. Other rule conventions need their own explicit statement; this answer applies to the one named for these exercises.
Exercise 11: An occupied destination
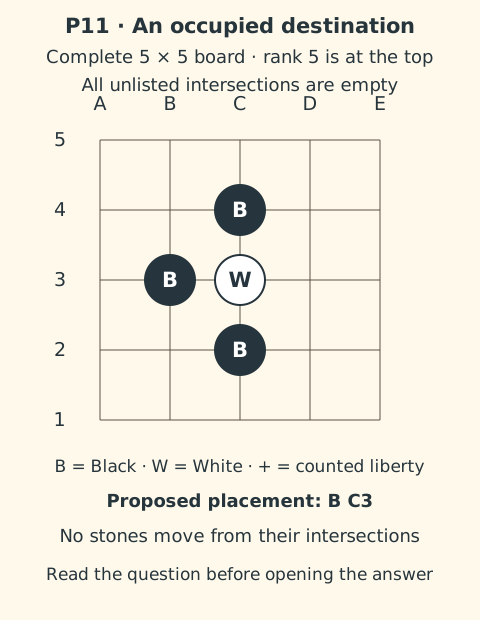
Black proposes placing directly on White C3. Can the player remove that white stone and put Black there?
Black: B3, C2, C4. White: C3.
Show answer and explanation for Go exercise 11
No. C3 is occupied, so Black may not place there. Capturing in Go occurs by legally placing on an empty intersection and removing opposing strings whose last liberty is filled. In the starting position, D3 is the empty last liberty of White C3, as shown in Exercise 7. The rejected proposal at C3 changes nothing: White C3 remains and no black stone is added. Checking vacancy comes before calculating captures or discussing whether a move looks useful. A capture is not a move onto an opponent’s stone.
Use the supplied history for the immediate ko: exercise 12
A current board alone cannot settle every repetition question. In this case the first diagram is the board immediately before Black D3. The answer diagram is the accepted board immediately after that capture. White’s next proposed placement is a trial to compare with the earlier complete board, not an authorised move to add to the accepted position.
Exercise 12: The immediate ko recapture
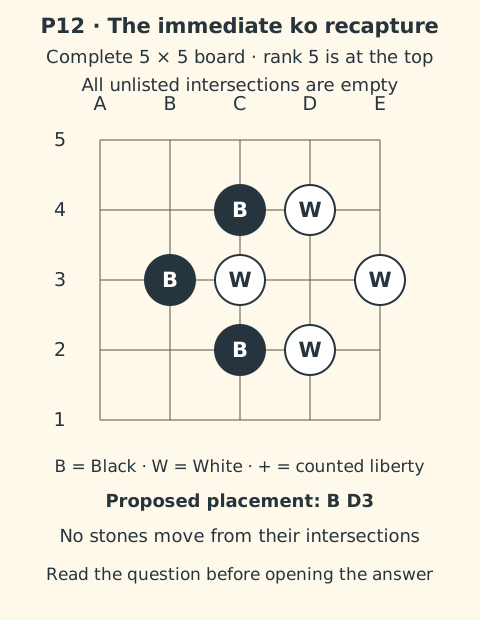
Black plays D3 and captures White C3. On the very next turn White proposes C3. Compare the proposed result with the complete board before Black’s move. What does the simple-ko convention prohibit?
Black: B3, C2, C4. White: C3, D2, D4, E3.
Show answer and explanation for Go exercise 12
Black D3 captures C3 and has C3 as its sole liberty. A trial White C3 would capture D3 and restore exactly the board shown before Black’s move. The supplied history is therefore enough to identify the immediate repetition: simple ko prohibits that immediate recapture. The accepted board after the rejected proposal is still the board after Black D3. Do not call every one-stone capture ko; both the shape and the prior position matter. This exercise teaches that specific prohibition and does not adjudicate a longer repetition sequence under a superko rule.
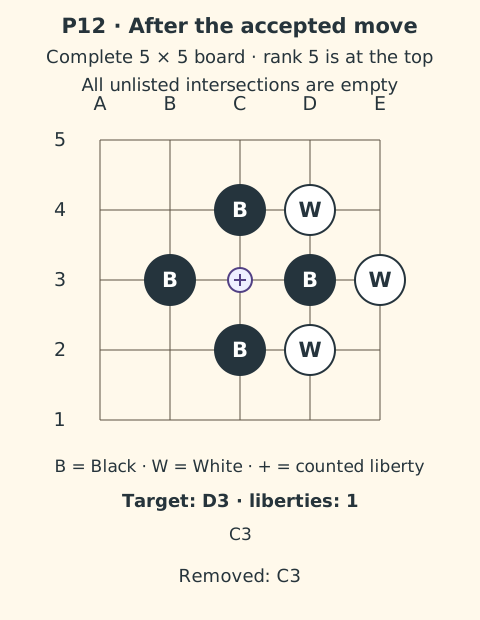
This answer establishes an immediate simple-ko recapture. It does not provide an alternative move, a ko-threat strategy or a ruling under every competition rule. In an actual game, identify the agreed rules and relevant history before resolving a dispute. The existence of a single captured stone is insufficient evidence by itself.
Keep a coordinate record and check the answer
Open the twelve positions, blank review record and explained answer key (TXT). The text record includes every occupied coordinate and the questions, so you can reproduce the positions without relying on a small image. Its answer key follows the blank practice sections; stop before that heading when testing yourself.
Exercise and target string:
Occupied coordinates and proposed placement:
Distinct liberties before:
Captured coordinates removed:
Own string and liberties after removal:
Repetition rule and supplied history:
Accepted board or reason for rejection:
Extra or missing point in my first answer:
For counting exercises, record the target string as well as its liberty list. For placement exercises, record both the removed coordinates and the accepted resulting board. For rejected proposals, keep the original board unchanged. In Exercise 12, distinguish the accepted position after Black’s first move from White’s rejected immediate recapture.
Work slowly enough to locate a discrepancy. If your total differs by one, check the edges, a diagonal and a shared empty point first. If the final board differs, check whether you removed every member of a captured string or accidentally left a trial stone from a rejected proposal.
Questions that prevent the most common mix-ups
Does a shared empty point count once or twice?
Once for a particular connected string. If the point borders two separate strings, it can appear in each string’s separate liberty set. Exercise 4 and Exercise 6 distinguish those situations.
Is atari already a capture?
No. A string with one liberty remains on the board. In Exercise 7, White C3 is removed only after Black legally occupies D3, its last liberty. Whether White has a useful response on its own turn requires the actual position and any repetition restriction.
Can a captured point become a liberty?
Yes, after removal it is empty. It counts for the target string only if it touches that string along a line. Exercises 7–9 list those new liberties explicitly; a distant captured point is not automatically a liberty of every friendly stone.
Does more liberty count mean a better move?
This worksheet does not rank candidate strategies. Liberty count can establish a local capture or self-capture condition; it cannot by itself measure territory, whole-board value, life and death or the result of a game. Keep the mechanics you actually checked separate from a strategic claim.
Take the method to another complete position
Choose a position with a known full board, side to move and rule convention. Name one string, list its liberties and check a proposed placement in order. Keep the resulting occupied-coordinate list so another reader can reconstruct your conclusion. If a diagram is cropped, do not assume its visible border is the board edge.
The original positions here cover local counting and stated placements. They do not certify every archive record or replace an official rulebook. A sequence of coordinates without a complete starting position cannot prove that a move captures, connects safely, forces an answer or wins territory. Ask for the missing position rather than filling it in from the lesson title.
Return to the Go / Weiqi game hub for other reading tasks or the game-family comparison to choose a different game. Chinese checkers jumps use a different movement rule and do not capture the jumped pieces; keeping that distinction explicit avoids importing a rule from the wrong game.
Sources and further reading
- British Go Association: How to PlayOrthogonal strings, liberties, whole-string capture, no self-capture after opposing capture, and immediate ko. Other scoring and repetition questions remain outside this worksheet.
A string can survive through mutual life even without two eyes: test a complete seki position and both players’ replies. If your exercise starts with handicap stones, first check the agreed setup and next player.
Continue from one atari to a complete ladder
Follow all 23 moves of an original ladder and the outside-stone comparison, keeping the full board and each string’s liberties.
Compare a larger recapture with immediate ko
Read the complete one-then-two snapback example and identify the extra removed stone that makes the board different.